I wanted something to hold my bolts and broadheads. But didn't want to pay a lot of money and besides I like making my own.
Wanted something I could wear at my hip, over the shoulder or across my back. What I made I can also send through the mail or check as baggage on the airline.
Materials:
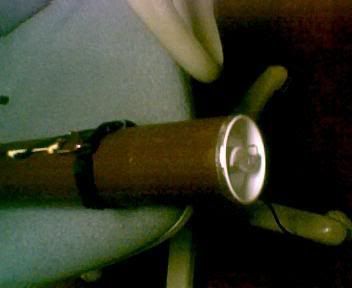
1. Erdie kraft mailing tube, 3" inside diamter x 24" long. Can get them at their web site http://www.erdie.com. Get one with their twist and pull end cap. It locks in place with a push and twist and comes off with a twist and pull. They have 2 wall thickneses. I searched a long time to find their mailing tubes. Theirs works because of their unique end cap which locks in place and unlocks and can be reused over and over.
2. AL foil tape - used by HVAC people, available at most h/w stores.
3. closed cell, stiff foam. about 3 1/8 diamter and 3" thick.
4. Parachute cord, about 4'. Heat seal both ends and tie double overhand stopper kots at each end.
5a. cat pet collar, expandable from 7" to 12", or
5b. 2 6" lengths of 3/4" nylon webbing, hot melt glue and 2 3/4" D-rings.
6. tarp guyline cord or any strong synthetic string with a diameter 1/2 or less of the diameter of the parachute cord. 2 10" lengths. Using double over-hand knots, make 2 loops ( http://www.animatedknots.com/doublefish ... erhandJoin).
Each loop will be used for Prusik knots:
http://www.animatedknots.com/prusik/ind ... dknots.com
7. optional: gaffer tape. I don't recommend duct tape, the adhesive dries and the tape will fall off. The gaffer tape is more expensive, but can be used in a lot more ways. Or you could use the AL foil tape if you don't mind a real shiny outside.
8. 2 micro carabiners - the really small wire gate ones. I like these:
http://www.backpackinglight.com/cgi-bin ... biner.html
Once you have the Erdie mailing tube, follow this procedure:
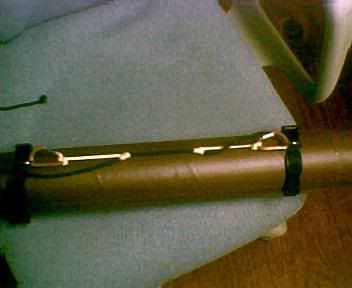
1. use narrow strips of the AL foil tape to seal the end edges of the kraft mailing tube. This will prevent water from ruining the tube over time. I recommend the AL foil tape, it is waterproof, the adhesive holds and lasts for years and it is very thin so will not interfere with the end cap.
2. If you are using the gaffer tape to waterproof the outside, then run strips from end to end. Do not overlap the ends of the tube with the gaffer tape. It is too thick and will prevent the end caps from working. I suppose you could also paint the tube with something to seal it from water. I already had the gaffer tape and so used that.
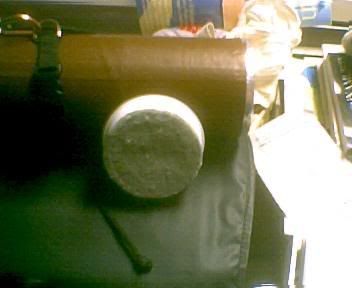
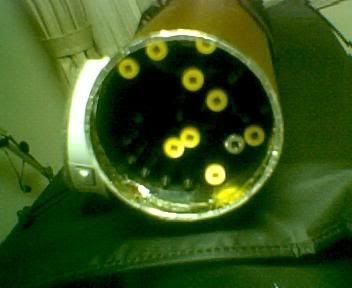
3. Cut the foam into a cylinder with a diameter slightly bigger than the inside diameter of the mailing tube so that it fits VERY snugly. Push the foam cylinder into one end of the tube, so that it is about 1" below the end. Broadheads can be pushed into the foam (without the cutting blades). The cutting blades are stored alongside the heads along with the washers (in a small zip lock bag).
4a. If you are using the cat collars, arrange them so that you can cinch one real tight about 4" to 6" from each end of the tube. You will probably have to undo some of the stitching and rethread the strap through the cinching end of the collar so that you can pull the strap tight and have it lock in place.
or
4b. If you are using the 3/4" nylon webbing (polyester webbing could also be used - it is more abrasion resistent and doesn't take up water like the nylon). Most fabric shops carrying polypro webbing and that could also be used. Position a D-ring at the mid-point of the 6" length of webbing and use the hot melt glue to glue the webbing in place about 4" to 6" from the end of the tube. Repeat on the other end with the 2cd webbing and D-ring.
For both 4a and 4b make sure the D-rings line up along the length of the tube.
5. Tie Prusik knots to the middle of the 4' length of parachute cord.
6. Girth hitch the carabiners to the loops on the prusik knots.
7.Clip one carabiner to each D-Ring. How you position the Prusik knots along the length of the parachute cord now determines how you can carry the tube:
A. slide the prusik knots as close together as possible. The Parachute cord now forms a carry handle for the tube, bolts and broadheads.
B. Slide the Prusik knots further apart so that you have sufficient cord to place the tube across your back with the cord across your chest. You can now carry the tube across your back either with the end cap in place or the tube open.
C. Slide the Prusik knots closer together from B. and you can carry the tube with the cord over your shoulder.
D. Unclip the carabiner from the D-ring on the braodhead end of the tube and adjust the distance between the Prusik knots so that you have sufficient length to go around your waist. Wrap the cord around your waist and clip to the top D-ring. You can now carry the tube fastened around your waist. Again with the end cap in place or removed.
By unclipping both carabiners and carrying the parachute cord in your pocket or inside the tube, you can:
1. place a mailing label on the tube and mail it anywhere in the world (that is what the tube is designed for), or
2. check the tube as baggage with the airline when you fly. You might want to get the thicker wall tubing considering airline baggage handlers.
I have found that with the 3" inside diameter tube, I can get 12 to 18 bolts with field points in the tube. I have half the bolts pointed in each direction. Also I can get 18 broadheads stuck in the foam with the cutting blades in the boxes and the washers in a small zip lock bag.
I also used some double sided carpet tape to stick some felt to the inside of the end caps to protect them from the field points and to make the assembly quieter.
I like this carrier much better than anything I have found commercially. It is versatile, VERY easy to make and doesn't cost a heck of a lot.
I hope that if you decide to make your own enjoy it as much as I like mine.